There are five types of canvas
1) Content canvas ( default canvas )
2) Tab canvas
3) Vertical tool bar
4) Horizontal tool bar
5) Stacked canvas
To execute an application, one content canvas or one tab canvas should be there.
Vertical tool bar, horizontal tool bar and stacked canvas cannot be created without content canvas or tab canvas.
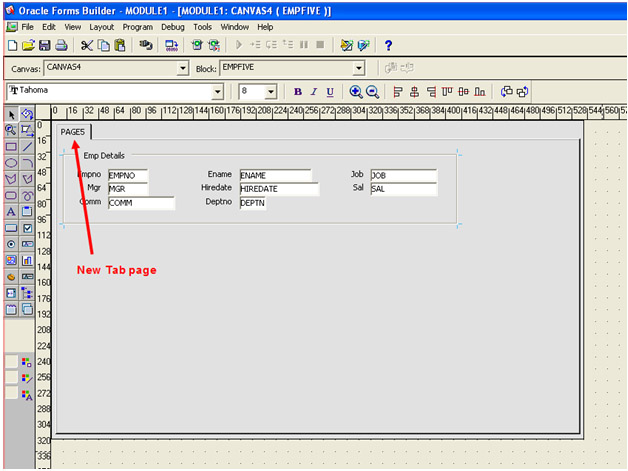
Example of TAB canvas
Create a new table EMPFIVE same as standard EMP table.
Create a new form based on table EMPFIVE using data block and layout wizard.
In the layout wizard select the canvas type as "Tab", and select New Tab Page ( default )
After selecting the type as " Tab" Next Move all columns from available items to displayed items Next Next Select Form Next Frame Title -- Emp DetailsNext Finish
As we have selected canvas type as "Tab" , A Tab page is created.
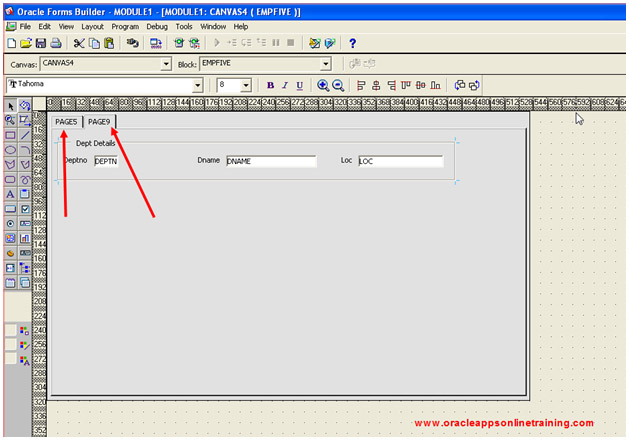
Create another data block based on DEPT table.
Tools Data block wizard Next Select table or view Next Table - DEPT Refresh Move all columns from available columns to data block columnsNext uncheck Auto-join data blocks Next Data Block Name -- DEPT Next Create data block and then call layout wizard Finish.
In the layout wizard , we need to choose the "New Tab page" in existing canvas.
Welcome to layout wizard Next Canvas -- Canvas4 Tab page -- ( New Tab Page ) Next move all columns from available Items to displayed Items NextNext Select Form Next Frame Title - Dept Details Next Finish.
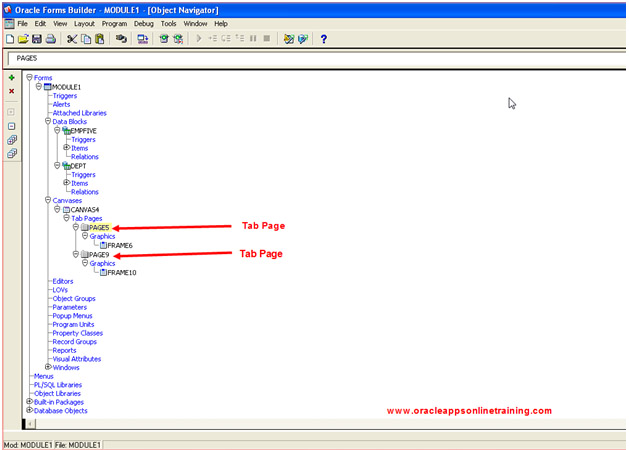
Observe, there are two page pages created in the form.
In Object Navigator also, we can see two tab pages in the canavs.
Change Label of the Tab pages in the properties.
For PAGE5 -- Label it as EMP.
For PAGE6 -- Label it as DEPT.
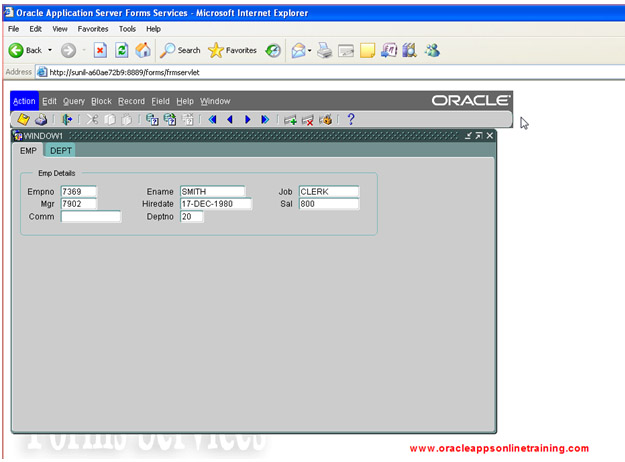
Save the form as EMP_DEPT.fmb
Compile and Run the form.
Using one form, we can work with both the tables. Note
Tab canvas can hold N no of Tab pages.
Advantage: Easy to navigate between pages.
Vertical tool bar canvas
Provides standard look and feel.
Can be used as an alternative to menu.
Example of vertical tool bar canvas
Create table EMPSIX ( same as standard EMP Table).
Create a new form with EMPSIX table ( using Data block wizard and layout wizard )
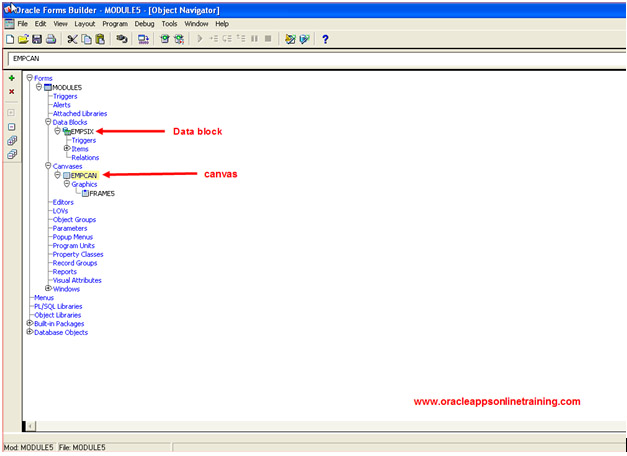
Rename the canvas as EMPCAN
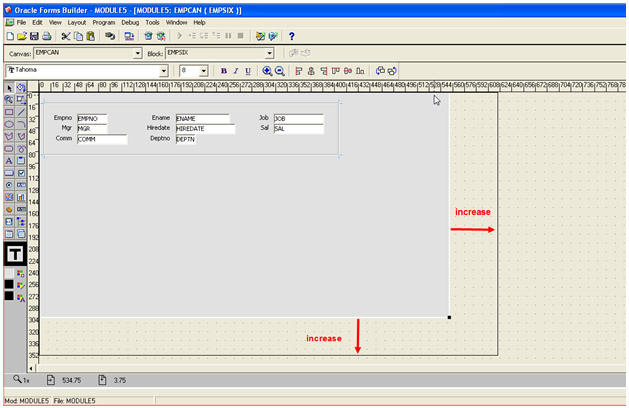
Go the layout editor and increate the length and breadth of the view ( the black line border ).
The block border is called as view.
The gray border is canvas.
In Object Navigator, create new canvas.
In the property palette , provide the following properties. General
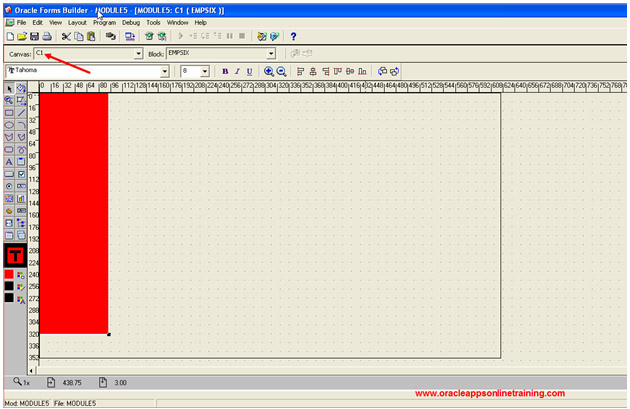
Name -- C1
Canvas type -- Vertical Toolbar Color
Background color -- red
In the Object Navigator --> Select the canvas C1--> Go to the layout editor ( Press F2 )
Resize the canvas C1 to small strip.
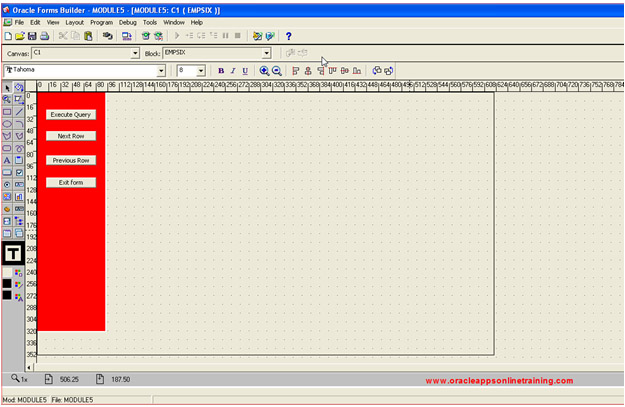
In the Object Navigator under EMPSIX Data block Under Items Create four new buttons.
Name the Items as B1, B2, B3 and B4.
Provide the following properties to all the four Items.
Property
Value
Name
B1
B2
B3
B4
Item Type
Push Button
Push Button
Push Button
Push Button
Label
Execute Query
Next Row
Previous Row
Exit Form
Canvas
C1
C1
C1
C1
All the four buttons will appear in the vertical toolbar as we have mention canvas as C1 in property palette.
Provide the following code in WHEN_BUTTON_PRESSED trigger and compile.
For button B1
execute_query;
For button B2
next_record;
For button B3
previous_record;
For button B4
exit_form;
Arrange the button in layout editor of vertical toolbar canvas.
In the Object navigator, select the default window ie WINDOW1
In the property palette of the WINDOW1
Functional
Primary canvas -- EMPCAN
Save the form as EMP_VERT.fmb
Compile the form
Run the form
Keep the cursor in field Empno, click on Execute Query button,
Click on other buttons and check the functionality.
Advantage:
Frequently used functionality can placed in vertical toolbar. It will be handy
Horizontal Toolbar canvas
Horizontal toolbar canvas is similar to vertical toolbar canvas. Please try it yourself.
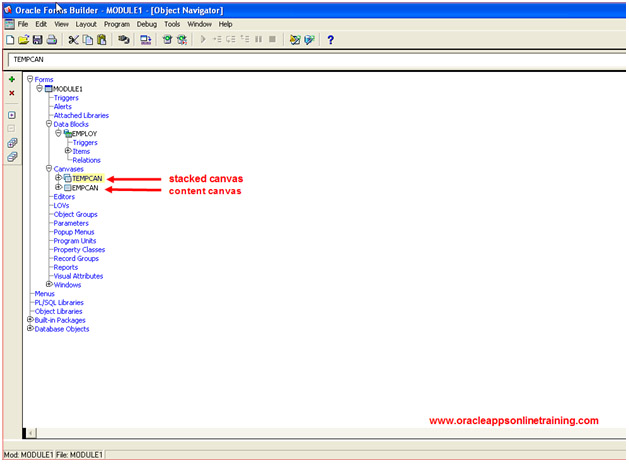
Stacked Canvas
Stacked canvas is displayed on top of content canvas.
We can show or hide stacked canvas programmatically.
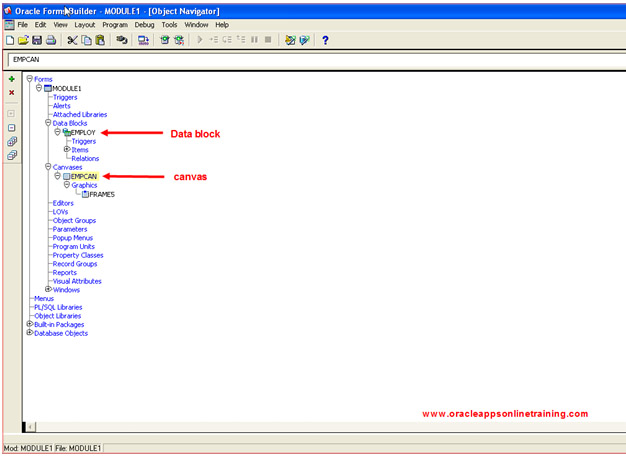
Create form based on table EMPLOY using datablock and layout wizard.
Rename the canvas as EMPCAN ( Content canvas ).
In Object Navigator, create new canvas.
In the property palette General
Name -- TEMPCAN
Canvas Type -- Stacked
Place wage_type, amount and cperiod in the stacked canvas.
Select three items go to property palette Physical
Canvas -- TEMPCAN
Create OK ( Button ) in canvas TEMPCAN ( using Layout Editor ( F2) )
In the property palette of the button,
Name -- B1
Label -- OK
Create WHEN-BUTTON-PRESSED trigger for OK button an provide the following code and compile.
go_item('EMPLOY.SAVE');
hide_view ('TEMPCAN');
Create SAVE ( Button ) in canvas EMPCAN ( using Layout Editor ( F2) )
In the property palette of the button,
Name -- SAVE
Label -- SAVE
Create WHEN-BUTTON-PRESSED trigger for SAVE button an provide the following code and compile.
commit_form;
Generation of ECODE automatically based in sequence
create sequence in oracle database.
SQL> create sequence s1
increment by 1
start with 1001;
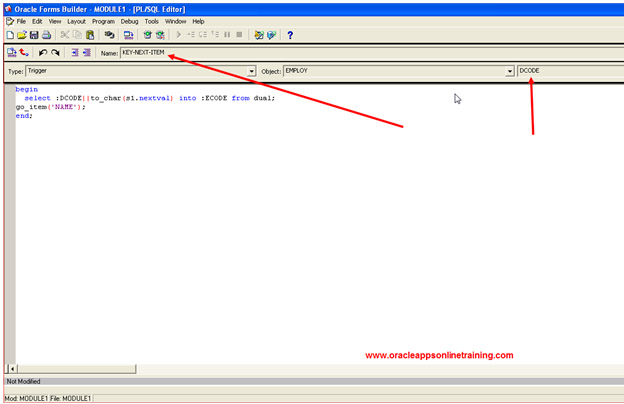
Create KEY-NEXT-ITEM for DCODE item, and provide the following code and compile
begin
select :DCODE||to_char(s1.nextval) into :ECODE from dual;
go_item('NAME');
end;
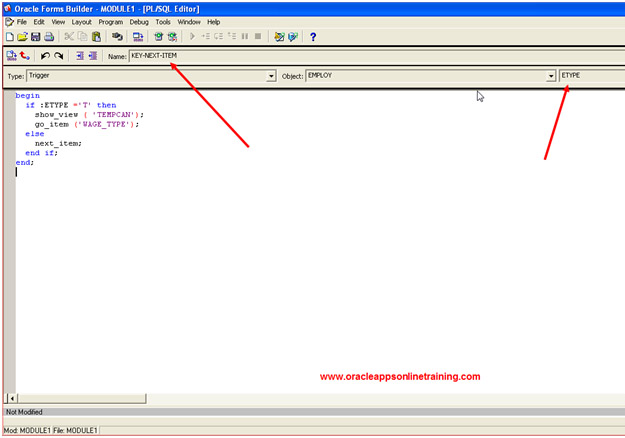
Create KEY-NEXT-ITEM for ETYPE item, and provide the following code and compile
begin
if :ETYPE ='T' then
show_view ( 'TEMPCAN');
go_item ('WAGE_TYPE');
else
next_item;
end if;
end;
Create WHEN-VALIDATE-ITEM for ETYPE item,
provide the following code and compile.
begin
if :ETYPE not in ( 'R' , 'T') then
message ('Employee type can be "R" or "T" only');
message(' ');
raise form_trigger_failure;
clear_item;
end if;
end;
Create KEY-NEXT-ITEM for COMM item and provide the following code and compile.
In the property palette of the ADDRESS item
Functional
Multi-line -- Yes
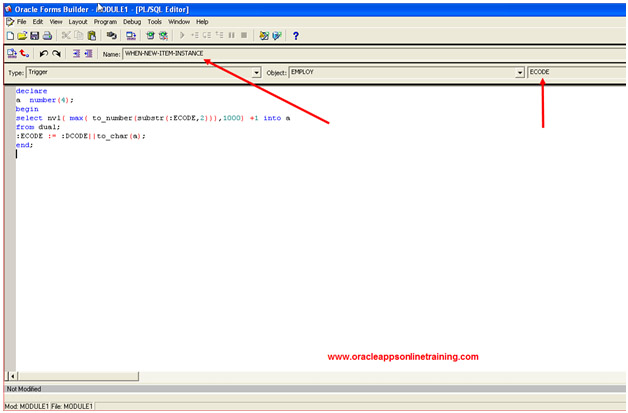
Generating ECODE using existing ECODE through select stmt
declare
a number(4);
begin
select nvl( max( to_number(substr(:ECODE,2))),1000) +1 into a
from dual;
:ECODE := :DCODE||to_char(a);
end;
Save the form as EMPLOY_STACK.fmb
Compile the form.
Run the form.
Provide the following details and observe the functionality
DCODE - F
ECODE - will be generated automatically
Name -- Arun
Address -- Hyderabad
Etype -- T ( click on Tab ) -- Stacked canvas is displayed
Wage Type -- D
Amount - 500
Cperiod - 5
Click on OK ( control goes to SAVE button of content canvas ).
Click on SAVE
Also, check the functionality of all the triggers.
Assignment
Create BANKMASTER table with following columns
Account No
Name
Address
Contact No
Current_balance
Open_date
Account_type ( Account type can be S or C )
Create stacked canvas for Account type S
Place the following Items
PAN_NO
NOMINEE_NAME
NOMINEE_DESIGNATION
Create stacked canvas for Account type C
Place the following Items
COMPANY_NAME
LICENCE_DATE
Create Data Block based on the above table and distribute columns in different canvases.
Activate the canvas according to ACCOUNT_TYPPE ( S,C )